Sending Web Push Notifications from Rails
How to deliver desktop notifications from your Rails app
Update: Check out Using the Push API with VAPID for sending Web Push notifications without needing to configure Google app settings
We've had push notifications in our mobile and desktop apps for sometime. It's now becoming possible on the open web.
Web Push notifications are powerful because they allow you to engage with your users even when they're not on your site.
I'm going to share how to I got a working demo of the new Web Push API from a Rails (or any Ruby) web application to push desktop-style notifications through supporting browsers - currently Chrome and Firefox at the time of this writing.
We'll cover the basics of implementing Push yourself though it's interesting to note that third party services are already stepping in to do some of the technical work for you, like Roost, PushCrew, or OneSignal.
The Apple Push Notification Service has made push notifications available to Safari since 2013. There are some nice tutorials for implementing Apple Push on Safari. The status of future support for Web Push in Safari is: "maybe?".
Why?
"Yeah, Ross, but Rails 5. Action Cable. Web Sockets. Server Sent Events. $MY_FAVORITE_ALTERNATIVE!"
You might not want to drop all those alternatives just yet, as browser support for Web Push still needs improvement. Web Push could be a good alternative for a subset push features for applications where deploying Rails 5 Action Cable would be overkill. Web push also currently relies on third party web which may or may not be advantage depending on your deployment options.
But the killer feature of Web Push is that notifications can be displayed even when the user is not on the site, something those other solutions cannot provide.
Demo
Want to see it in action first?
I created a demo at the Service Worker Rails Sandbox to show how a simple push message would look like. Try it out in Firefox or Chrome or check out the source code on GitHub.
My demo is mostly informed by Mozilla's Service Worker Cookbook, which I highly recommend if you're looking to learn more about Service Worker.
Bird's eye view
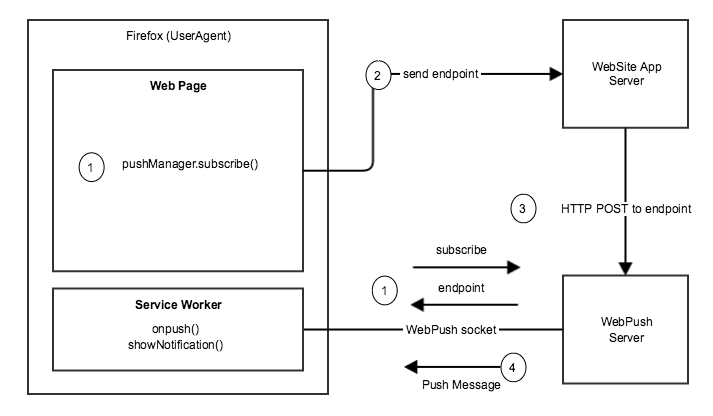
Delivering push notifications involve interactions among three parties - the user (through her browser), your Rails application, and the Web Push server, which for our purposes is either Google or Firefox.

Diagram courtesy of the Firefox wiki
We'll use JavaScript on the user's current page to register a service worker subscribe to push notifications via the
pushManagerinterface. The browser will make a request to the Web Push server to aPushSubscriptionwhich will contain a unique endpoint to the Web Push server and authorization keys required for encrypting the push notification request body.We'll post the subscription info to our Rails app to be persisted on the server side.
To send a push notification, we'll use the
webpushRuby gem triggered from our Rails app.webpushis responsible for sending a proper request to the Web Push server, including encryption of the message payload for delivery.If the request is successful, the Web Push server opens a socket to our registered service worker which can listen for
'push'events to show a notification to the user. Since service workers have a lifecycle independent of the web page, they can process events even when the user is not visiting our website.
Setup
At the time of this writing, we'll need to configure our app to use the Google Cloud Messaging platform by registering for application keys. No special authorization is needed to use the Firefox push server as far as I can tell.
Google provides some decent instructions for registering your app for push notifications which involves some clicking around on the Google developer console. (I've heard rumors this may not be necessary in the near future.) You'll want to come away with a project id for your app and an API key to make authorized requests to the push server.
Both Firefox and Chrome will expect us to link to a manifest json file to
provide metadata for push subscriptions and notifications. Here's an example:
{
  "name": "Your app name",
  "short_name": "Your app",
  "icons": [{
    "src": "images/icon-192x192.png",
    "sizes": "192x192",
    "type": "image/png"
  }],
  "start_url": "/",
  "display": "standalone",
  "gcm_sender_id": "<Your Project ID>",
  "gcm_user_visible_only": true
}
Update: as of Chrome 52, it is no longer necessary to set the gcm_sender_id
and gcm_user_visible_only attributes in your manifest.json configuration
as long as you use VAPID details as described in my followup post.
For now, this file can go in public/manifest.json. In your app/views/layouts/application.html.erb template, you'll also need to
add a special <link> tag to the manifest:
<link rel="manifest" href="/manifest.json">
Here's the actual manifest.json for the Service Worker Rails Sandbox push demo as another point of reference.
Subscribe through a service worker
Yes, Service Worker time! In case you missed it, I'm really excited about Service Workers. Service Workers have the potential to level the playing field of reliability between the web and mobile devices.
Service workers must be deployed a bit differently than JavaScript evaluated in the web page context. I've gone into more detail on how to integrate Service Worker with Rails previously but for now, here's the quick setup for push.
In application.js (or another .js required by application.js) we'll use this following snippet to request registration of
a service worker script.
// app/assets/javascripts/application.js

if ('serviceWorker' in navigator) {
  console.log('Service Worker is supported');
  navigator.serviceWorker.register('/serviceworker.js')
    .then(function(registration) {
      console.log('Successfully registered!', ':^)', registration);
      registration.pushManager.subscribe({ userVisibleOnly: true })
        .then(function(subscription) {
            console.log('endpoint:', subscription.endpoint);
        });
  }).catch(function(error) {
    console.log('Registration failed', ':^(', error);
  });
}
This code registers a service worker on the given scope via navigator.serviceWorker.register. This returns a Promise which will resolve to an instance of ServiceWorkerRegistration. This registration object has a pushManager property which we use to subscribe to the Web Push server. The { userVisibleOnly: true } parameter is required for us to use notifications.
Troubleshooting
I got an error at this stage in Google Chrome the first time: Unable to subscribe to push DOMException: Registration failed - push service error. Turns out, the pushmanage.subscribe request can fail if you haven't properly configured your manifest.json with a valid Google Cloud Message sender id.
Also, if the pushManager can't find the manifest.json via the link tag, or
if it's not included in the page altogether, you may see another error: Unable to subscribe to push DOMException: Registration failed - manifest empty or missing, so you'll need to get that working to proceed.
The Service Worker
In a separate file, app/assets/javascripts/serviceworker.js, we'll have our service worker show notifications when the 'push' event is received:
function onPush(event) {
  var title = (event.data && event.data.text()) || "Yay a message";

  event.waitUntil(
    self.registration.showNotification(title, {
      body: "We have received a push message",
      icon: "/assets/path/to/icon.png",
      tag:  "push-simple-demo-notification-tag"
    });
  )
}

self.addEventListener("push", onPush);
Because serviceworker.js needs to be a separate script available on the root
path, we either need to copy it to our public/ directory , or, even better, we
can use the serviceworker-rails (Star it on GitHub!) gem which will allow us to make use of both the asset pipeline and custom routing features we need.
Rails setup
# Gemfile

gem 'serviceworker-rails'
To routes requests from /serviceworker.js to our JavaScript file in the asset pipeline, we'll configure the service worker rails middleware as follows:
# config/initializers/serviceworker.rb

Rails.application.configure do
  config.serviceworker.routes do
    match "serviceworker.js"
  end
end
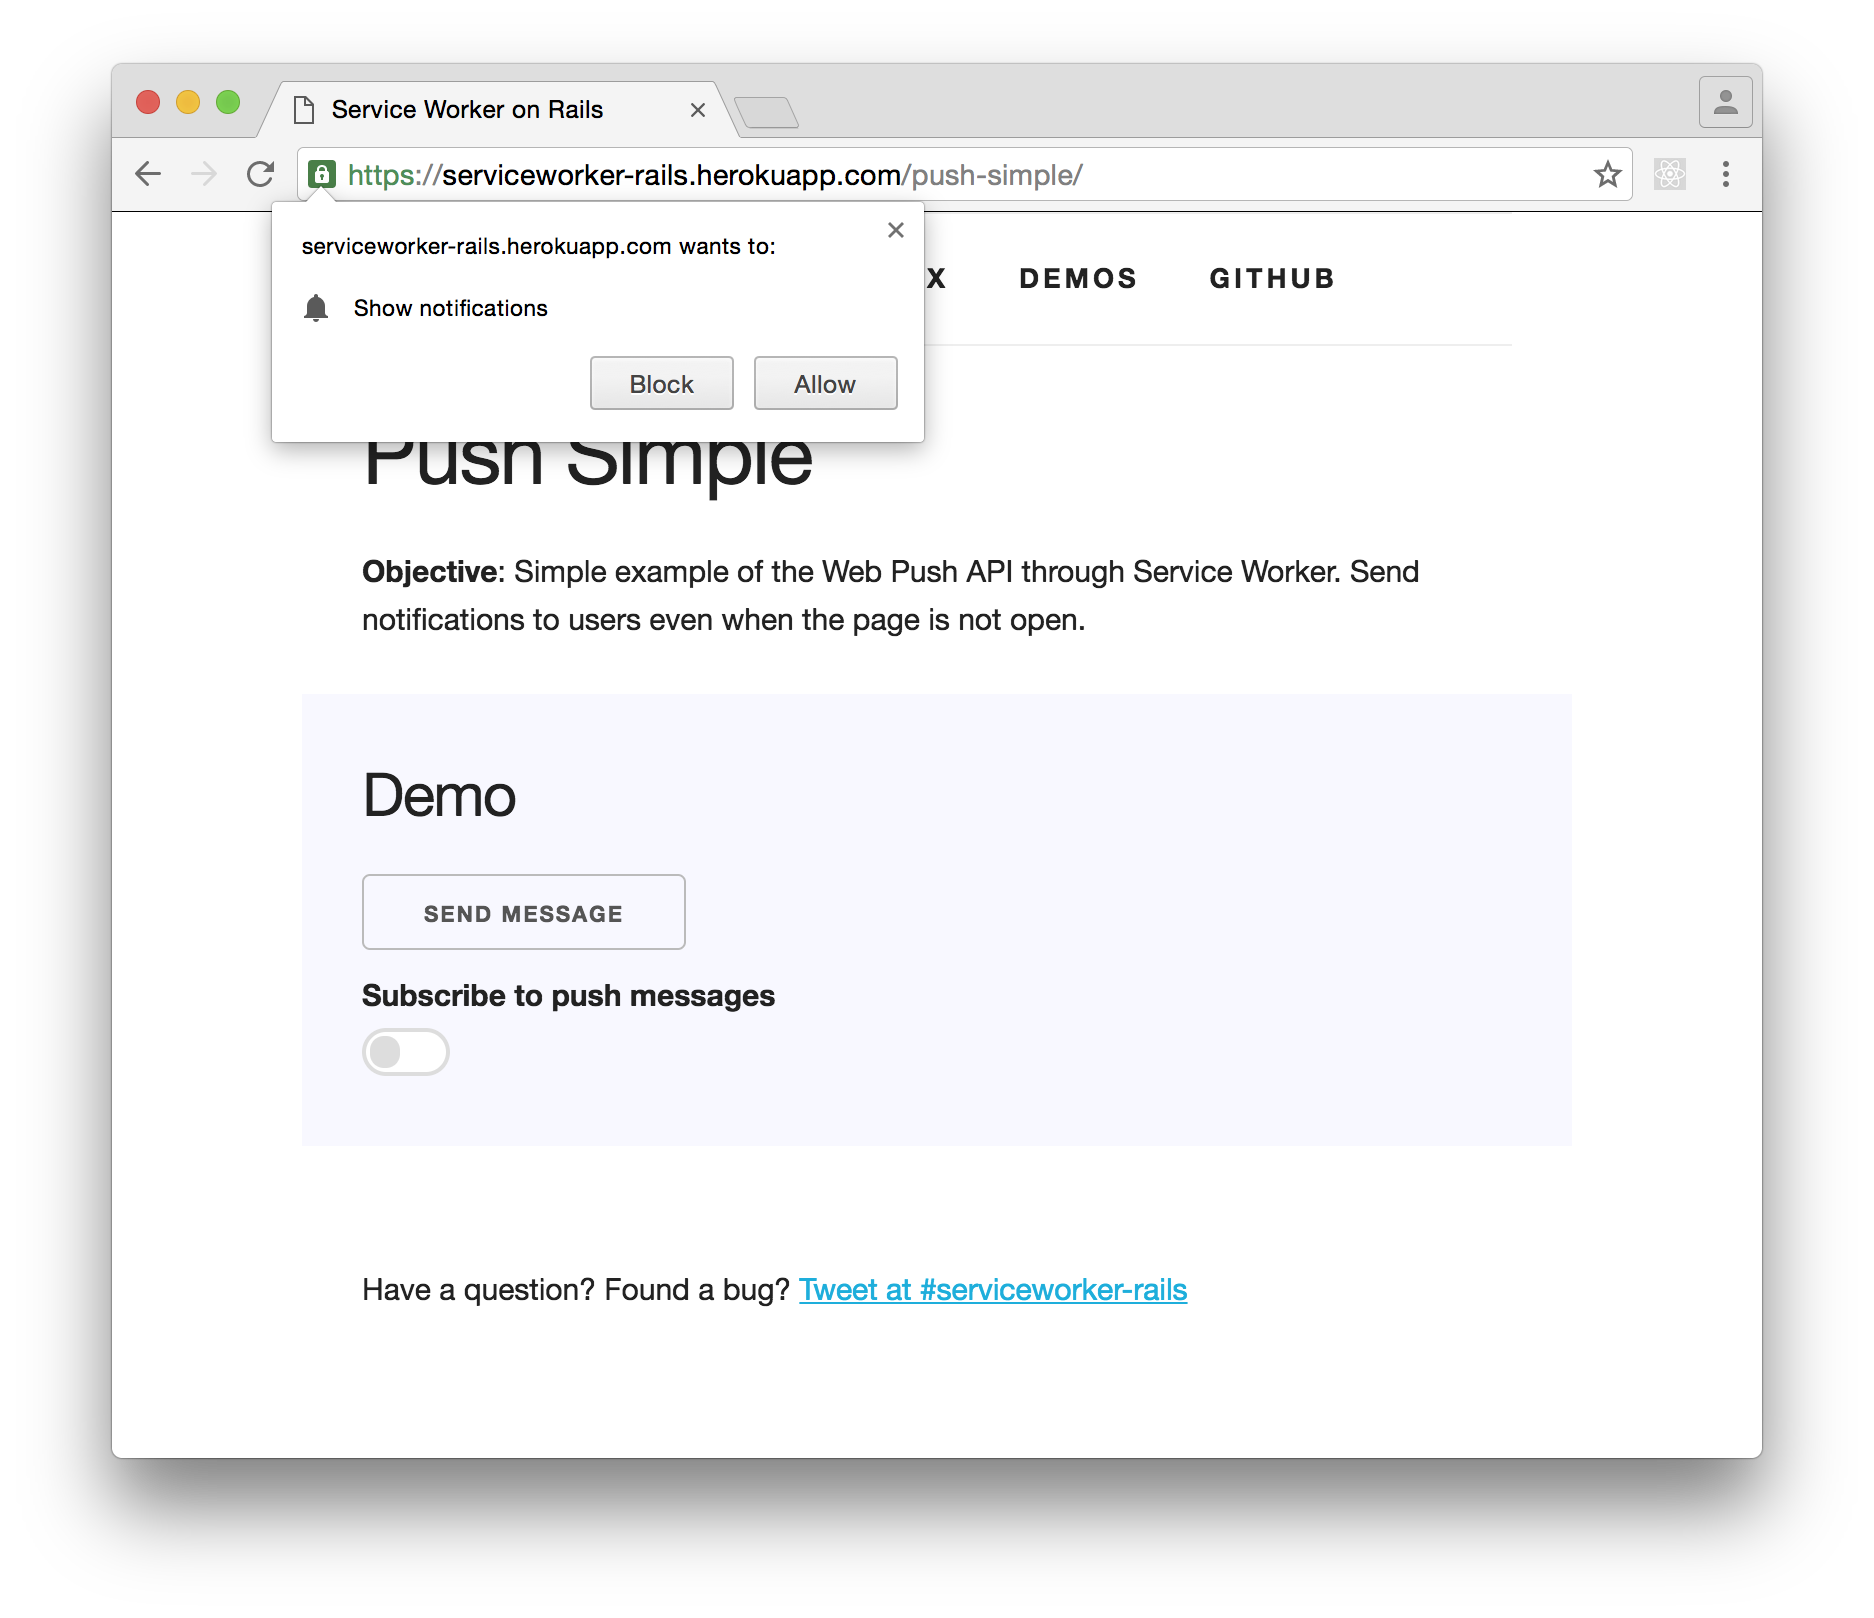
With these settings, we should be able to see our service worker register with the logging we put in place and be able to accept the browser prompt to receive notifications.
As a side note, we can also use the serviceworker-rails routing to move our
manifest.json file to app/assets/javascripts'/ from the public/ directory so we can take advantage for the asset pipeline, say for calculating image paths, for this file as well:
# config/initializers/serviceworker.rb

Rails.application.configure do
  config.serviceworker.routes do
    # ...

    match "manifest.json"
  end
end
Persist the subscription
Let's set up a controller action to serialize the subscription into the visitor's session though any persistence method that will allow us to retrieve the subscription(s) for a given user will do.
The push subscription has important pieces of data: the endpoint and a set of keys: p256dh and auth. We need use this data in requests from our rails app to the push server.
// subscription.toJSON();

{
  endpoint: "https://android.googleapis.com/gcm/send/a-subscription-id",
  keys: {
    auth: "16ByteString",
    p256dh: "65ByteString"
  }
}
When our visitor subscribes, we can post the subscription to our Rails app:
reg.pushManager.subscribe({ userVisibleOnly: true })
  .then(function(subscription) {
    $.post("/subscribe", { subscription: subscription.toJSON() });
  });
The route:
# config/routes.rb

post "/subscribe" => "subscriptions#create"
Our controller - of course, greatly simplified for the purposes of the this demo:
# app/controllers/subscriptions_controller.rb

class SubscriptionsController < ApplicationController
  def create
    session[:subscription] = JSON.dump(params.fetch(:subscription, {}))

    head :ok
  end
end
Push it
Now that we have a subscription, we can send a push notification. For this, we'll use the webpush gem:
# Gemfile

gem "webpush"
With the subscription info, we have what we need to send a message to a specific user that will get encrypted in passing over the wire.
Here's a typical usage:
Webpush.payload_send(
  message: "Hello World!",
  endpoint: "https://android.googleapis.com/gcm/send/a-subscription-id",
  auth: "16ByteString",
  p256dh: "65ByteString"
  api_key: "google_api_key" # omit for Firefox, required for Google
)
As a proof of concept, we'll create an endpoint to trigger a push notification directly from a user interaction in the browser.
<!-- a view -->
<button class="js-push-button">Send a message</button>

<script type="text/javascript">
  (function() {
    $('.js-push-button').on("click", function onClick() {
      $.post("/push");
    });
  })();
</script>
Start with a button to trigger a POST to a new /push endpoint in our app. In a real Rails app, you'd probably deliver push notifications from background jobs in response to other events in the system.
# config/routes.rb

post "/push" => "push_notifications#create"
Route the request to a new controller.
# app/controllers/push_notifications_controller.rb

class PushNotificationsController < ApplicationController
  def create
    Webpush.payload_send webpush_params

    head :ok
  end

  private

  def webpush_params
    subscription_params = fetch_subscription
    message = "Hello world, the time is #{Time.zone.now}"
    endpoint = subscription_params[:endpoint],
    p256dh = subscription_params.dig(:keys, :p256dh)
    auth = subscription_params.dig(:keys, :auth)
    api_key = enpoint =~ /\.google.com\// = ENV.fetch('GOOGLE_CLOUD_MESSAGE_API_KEY') || ""

    { message: message, endpoint: endpoint, p256dh: p256dh, auth: auth, api_key: api_key }
  end

  def fetch_subscription
    encoded_subscription = session.fetch(:subscription) do
      raise "Cannot create notification: no :subscription in params or session"
    end

    JSON.parse(Base64.urlsafe_decode64(encoded_subscription)).with_indifferent_access
  end
end
The controller deserializes the subscription from the session and builds up the
necessary parameters to send to the Webpush Ruby client. Only the :endpoint is
required to send a notification in theory. The :p256dh and :auth keys are also required if providing a :message parameter, which must be encrypted to deliver over the wire. Google requires the Google Cloud Message API key we grabbed from th developer console, so we test the endpoint to
decide whether to include it in the request.
If everything worked, we get a push notification!

Unsubscribing
We can programmatically turn off notifications by calling
PushSubscription#unsubscribe. This could be done in a callback to a click handler, for example:
function unsubscribe() {
  navigator.serviceWorker.ready
    .then((serviceWorkerRegistration) => {
      serviceWorkerRegistration.pushManager.getSubscription()
        .then((subscription) => {
          if (!subscription) {
            console.log("Not subscribed, nothing to do.");
            return;
          }

          subscription.unsubscribe()
            then(function() {
              console.log("Successfully unsubscribed!.");
            })
            .catch((e) => {
              logger.error('Error thrown while unsubscribing from push messaging', e);
            });
        });
    });
}

$(".js-unsubscribe-button").on("click", unsubscribe)
You'd also want to send a request to your Rails app to delete the persisted subscription data from the backend which will no longer be valid on the Web Push server. That exercise is left up to you!
Wrap up
This took quite a bit of setup though not nearly as much as getting Apple Push Notifications to work in Safari. Overall, the Web Push API is an interesting step for the web in terms of feature parity with mobile.
What do you think?

